Mail Routing for Office 365
If you are using Microsoft Office 365 as your mail service, setting up your mail flow to include GlobalCerts encryption services is done using a 'Connector'. First you need to set up a connector to our Fast&Secure service. Then, you'll create mail flow rule(s) that will utilize this connector when needed. These instructions assume you're on our default shared service, 'gc1.fastandsecure.net'. Please contact support@globalcerts.net if you're unsure and need to find out the hostname or IP address of your hosted service.
Setting up a Connector to Fast&Secure
- Login to your Office 365 tenant's Exchange Admin center
- In the menu, click on Mail Flow, then Connectors. Click on the "+" icon to create a new connector.
- For the mail flow scenario select From "Office 365" and To "Partner Organization" and click Next.
- Name the connector 'Fast&Secure' and give it a description, click Next.
- Select "Only when I have a transport rule set up that redirects messages to this connector" on the next page, click Next.
- On the next page, check "Route email through these smart hosts" click the "+" icon to add a route. Enter "gc.fastandsecure.net" here, click "Save" then click Next.
- Next, Make sure to check the box "Always use Transport Layer Security (TLS) to secure the connection (recommended)" so that your mail is sent via encrypted TLS connections to our service.
- For additional assurance, you can select that "the subject name or subject alternative name (SAN) matches this domain name:" and enter *.fastandsecure.net in the box.
- On the next page, review the connector, click Next
- Validate the connector by entering in a test email address. This can be our email 'support@globalcerts.net' or one of your external email addresses. Don't worry if it says the validation failed. Click 'Save'.
Setting up an Outbound Mail Flow Rule
- Login to your Office 365 tenant's Exchange Admin center.
- In the menu, click on Mail Flow, then "Rules". Click on the "+" icon to "create a new rule...".
- Name the rule something like "Route outbound to F&S"
- Click "more options..." at the bottom.
- Under "*Apply this rule if..." select "The recipient is..." "external/internal" and select "Outside the organization" click OK.
- If you would like to add additional conditions, click "Add Condition" or "add exception" and provide further restrictions on when to use the connector.
- Under "Do the following" select "Redirect the message to" "the following connector" and select the "Fast&Secure" connector you established earlier.
- Click Save.
If you have established an SPF record in your DNS for your domain, please remember to include our service in the record by adding "include:_spf.fastandsecure.net" to your record. This will help ensure that your messages delivered via our service will be pass spam checks and won't be caught in junk filters.
Inbound Mail Routing (Optional)
If you have purchased advanced ZeroSpam Anti-Spam and Anti-Virus protection for your organization through GlobalCerts, then you simply need to route all inbound mail to our spam/virus protection service by changing your MX record in your public DNS to the values we have sent you, and disregard the rest of this section. The values will be something like "filterXXXXX.zerospam.ca". Do not change your MX record until we have provided the proper values.
Since your users will now have fully functioning GlobalCerts accounts, other customers may now automatically send you encrypted emails using certificate-based S/MIME encryption. If you don't receive email from any of our other customers or partners using S/MIME, you can leave our services out of your inbound mail path.
If you do receive encrypted emails from our other customers that arrive unreadable (see article here), you will want to route these inbound encrypted emails to our service. You can do this by creating another mail flow rule similar to the one above, except the Conditions will be:
- "The sender..." -> "is external/internal" and select "Outside the organization"
- "The recipient..." -> "domain is" and then add all the domains that you would like to route inbound mail for (any domains in your tenant that have secure users)
- Under "Do the following" select "Redirect the message to" "the following connector" and select the "Fast&Secure" connector you established earlier.
- IMPORTANT: To ensure a message never 'loops' between Office 365 and our service, click the "Add Exception" and select "A message header..." -> "includes any of these words" and enter "X-GlobalCerts-Milter" for the header name, and add "fastandsecure.net" as a word for the header value. The will prevent the rule from triggering again if the message has already gone through our service.
Ensuring Delivery of Your Inbound Messages

NOTE: This only applies if you are using Fast&Secure as your inbound MX record. If your MX record is set to Office 365, disregard this section.
To ensure that all inbound emails from our service are delivered to your Office 365 tenant, it is best to create a Connector in Office365 specifying our service. This will accomplish two things: (1) It will make sure no rate limiting or throttling occurs from our service to Office 365, and (2) it ensures all your inbound mail flows through our service; spammers won't be able to connect directly to Office365 to try and send you emails.
Here are the steps to create the proper inbound connector (adapted from https://docs.microsoft.com/en-us/exchange/mail-flow-best-practices/use-connectors-to-configure-mail-flow/set-up-connectors-for-secure-mail-flow-with-a-partner#example-security-restrictions-you-can-apply-to-email-sent-from-a-partner-organization).:
First create a new connector within the Exchange Admin Center with the following mail flow scenario:
To restrict all mail sent to your organization to our Fast&Secure service, use these options during setup:
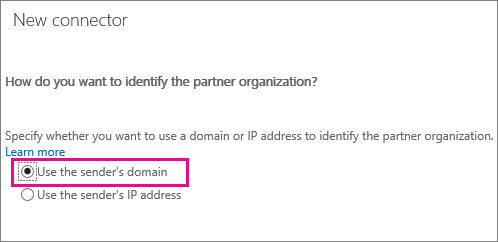
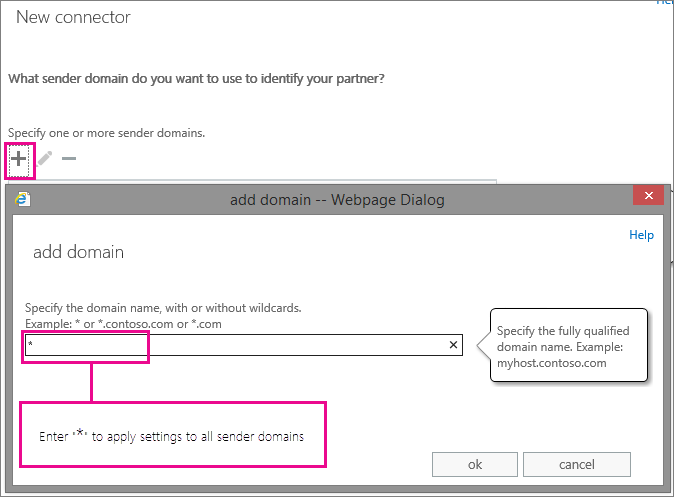
When you set these restrictions, all mail sent to your organization must be sent from a server with a certificate issued to 'fastandsecure.net'. All other internet traffic will be rejected. If you need your Office365 tenant to accept mail direct from the internet, do not implement this connector!
As always, GlobalCerts is there to assist you in setting up your mail routing properly. At your discretion you can allow GlobalCerts support delegated access to your Office 365 tenant so that we may set up these rules for you.
Related Articles
Routing Mail From Microsoft 365 To Your SMG
If you are using Microsoft 365 as your mail service, setting up your mail flow to include GlobalCerts SecureMail Gateway(s) is done using a 'Connector' and routing rules. First you need to set up a connector to your SMG. Then, you'll create mail flow ...SMG Mail Routing for Microsoft Exchange
If your organization is using Microsoft Exchange for your email server infrastructure, below you will find details on routing your outbound email through the SecureMail Gateway server so that it can secure outgoing emails: Setting up a "Send ...Multi-Factor Setup for Office 365 Accounts
This FAQ will guide you through the process of setting up Multi-Factor Authentication (MFA) on your Office 365 accounts, which is now a requirement since Feb 28 2020 on all Fast&Secure accounts. The walk-through will focus on using the Microsoft ...Routing your mail through Fast&Secure
If you are only using Fast&Secure services for encryption services and you are hosting your mailboxes on your own on-premise mail server or another hosting provider, you will need to ensure that both outbound and inbound mail are securely routed to ...How do I change the SMG to use a new mail server?
If you are migrating your mail server or simply moving it's IP address, the SMG will need to have a couple of settings changed to use the new mail server. Log in to the SMG administration console at https://<smg ip address>:444/ (default login is ...